Game Mod
For today, I decided to try to make a mod for one of my favorite games: Europa Universalis IV. Specifically, I wanted to try to make my own faction, while the game does, in fact, feature a faction creator it is heavily limited, with only preset colors, logos, and models. I wanted more, so thus I attempted to mod the game. To create a mod for this game, you start by creating a folder for the mod (which I will later be archiving). After this, we create a .mod file that contains the mod’s location, name, and the supported version of the game
Here is what my .mod file looked like:
name=”Vulmeria”
archive=”mod/Vulmeria.zip”
tags={
“Alternative History”
“Gameplay”
}
picture=”image.png”
supported_version=”1.24.*.*”
After that was created I did a little research. I learned that most mods that add factions into the game require 4 different folders: the localisation folder which contains the countries basic information, being it’s unique tag of 3 characters, its name, and its adjective form —ie, America to American; the gfx folder which contains the graphical components of the faction, the decisions folder which contains the decision to actually spawn the faction, and the common folder where you actually assemble the faction. These folders must be named precisely as I described, or else the game cannot recognize them.
The localisation folder must possess e a file called zcountries_l_english.yml. This contains the country’s name, adjective, and code. This information must be formatted in the following manor:
1_english:
(Code):0 “Country name”
(code)_adj:0 “country adjective.”
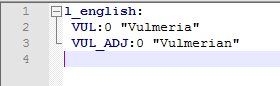
Here was my file. Remember, the code is only 3 characters, no more, no less.
Next up, I worked on the gfx folder. This contains a models folder, flags folder, and an entities folder. The models folder contains a folder called units which has the faction’s models. Each faction must possess 4 cavalry units, 4 infantry units, and 4 artillery units. Each model has a spec, a normal, a diffuse, and a mesh. For the cavalry units, you need horse models as well. Next, the flags folder contains a .tga file called (name).tga which possesses the country’s flag in a 128X128 format. Finally, the entities folder contains a file that attaches the unit models to the faction’s units. This file is called (your country’s code)_units.asset. For example, mine is called VUL_units.asset. This file was quite difficult to decipher, but after a lot of research and tinkering, I feel as if I understand it. For each unit, you must have an entity for it which contains the name, mesh, and states.
This information is formatted in the following:
entity{
name = “(Code)_(unit type)”
version = 1
state = { name = “idle” animation = “idle” }
state = { name = “walk” animation = “walk” }
state = { name = “attack” animation = “attack” }
state = { name = “retreat” animation = “retreat” }
#state = { name = “death” animation = “death” }
#state = { name = “extra_state_1” animation = “extra_state_1” }
#state = { name = “extra_state_2” animation = “extra_state_2” }
#state = { name = “extra_state_3” animation = “extra_state_3” }
attach = {
Right_hand_node = “mandate_MNG_spear_entity” (this attaches an object to the unit’s right hand, in my case since I was using prebuilt weapons, I did not have to include the weapon meshes, however, even though this was the same for the actual models, I had to include them.)
}
}
The unit type is the specific unity, either INFANTRY, CAVALRY, or ARTILLERY followed by _number where the number is which unit it corresponds to, whether it be the first infantry or the 4th one. Here is an example of one of my entities, this one being the 3rd infantry:
entity = {
name = “VUL_INFANTRY_3”
pdxmesh = “mandate_QNG_infantry_03” (make sure this is spelled exactly like the mesh or else the game will crash or load the wrong model)
version = 1
state = { name = “idle” animation = “idle” }
state = { name = “walk” animation = “walk” }
state = { name = “attack” animation = “attack” }
state = { name = “retreat” animation = “retreat” }
#state = { name = “death” animation = “death” }
#state = { name = “extra_state_1” animation = “extra_state_1” }
#state = { name = “extra_state_2” animation = “extra_state_2” }
#state = { name = “extra_state_3” animation = “extra_state_3” }
attach = {
Left_hand_node = “grhoup_rifle_03_entity”
}
}
You must do this for all 4 infantry, cavalry, and artillery, as well as each cavalry’s horse.
Next, there is the decisions folder which simply contains a text file called (name)Nation.txt (in my case VulmeriaNation.txt). inside this is the following (with my file as an example):
country_decisions = {
VulmeriaNation = {
major = yes
potential = {
normal_or_historical_nations = yes
NOT = { has_country_flag = formed_Vulmeria_flag } (ensures the country does not already exist)
OR = {
ai = no (wheter or not the AI can form the nation)
is_playing_custom_nation = yes (if you can form the modded nation from a custom one)
}
OR = {
primary_culture = wu (primary culture)
}
religion_group = eastern (religion group)
}
allow = {
NOT = { exists = VUL (to ensure there can’t be 2 of the nation)}
is_free_or_tributary_trigger = yes (whether or not the initial nation has to be a free independent nation or not)
is_at_war = no (whether or not the initial nation can be at war and found the new nation)
is_tribal = no (if the nation can be formed by tribal nations)
owns_core_province = 636 (provinces the initial nation must own before receiving the decision (the province codes can be found within the game’s wiki) repeat this line if need be for multiple provinces)
}
effect = {
change_tag = VUL (changes your country tag to the new country’s tag)
if = {
limit = {
is_part_of_hre = yes
is_elector = no
is_emperor = no
}
every_owned_province = {
limit = {
is_part_of_hre = yes
}
set_in_empire = no
}
}
if = {
limit = {
NOT = { government_rank = 2 }
}
set_government_rank = 2
}
add_prestige = 60 (gives your nation X prestige upon forming)
add_country_modifier = {
name = centralization_modifier
duration = 7300 (this doesn’t seem to affect anything)
}
set_country_flag = formed_Vulmeria_flag (sets the country’s flag to the new one)
}
ai_will_do = {
factor = 0
}
}
}
if you want to exclude a nation from being able to form your nation include NOT = { tag = (code)}.
Finally, we have the common folder where we actually combine all of this information. first, create a countries_tags text. This is where we actually connect the country’s tag and name and set it with all existing countries. Now, for this file, go into your game’s install directory, go to Europa Universalis IV\common\country_tags and copy the already existing 00_countries file into the mod’s common/country_tags folder (create if need be). On a new line, under the special countries section add (code) = “countries/(name).txt”. This sets the nation’s information to the information found in the text file. Speaking of the country text file, back in the common folder create a countries folder then a (name).txt inside of the newly created folder. For this, I recommend copying an existing country’s text file found, again, in Europa Universalis IV\common\countries as this file contains things such as the list of all the country’s possible ruler, general, and ship names, the names of newly created armies and fleets, the country’s map color (in RGB), the models for buildings and ships, and many more. Of course, change the lines to create a unique nation, however, I recommend copying an existing file to help structure yourself. Finally, back in the common folder create a folder called country_colors and in which a text file called 0_country_colors.txt. This file must again be copied from the game’s version found in Europa Universalis IV\common\country_colors and on a new line, write the following, replacing the color codes with whatever colors you would like:
# (name) is just a comment but helps organization
tag= {
color1= { 255 0 0 } (the primary color for units) (RGB)
color2= { 0 0 0 } (the secondary color for units) (RGB)
color3= { 255 255 0 } (the tertiary/ accent color for units) (RGB)
}
With all this done, your mod should be ready! now we simply archive the mod’s folder and ensure the .mod file of the mod connects to the right location. Then just boot up the game, activate the mod, fulfill the requirements, and you should get a decision to form your new nation.
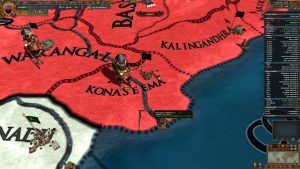
Here’s my modded nation, with glorious custom models, colors, and a flag!
Well, thank you all for reading, and as always, if you have any questions or comments, feel free to ask!